Concrete is a costly investment, and it’s prone to damage from natural wear-and-tear. Inspecting and repairing damaged concrete helps to extend its life cycle.
Traditional patch repairs, however, often trigger corrosion initiation in adjacent passive areas because the active corrosion sites provide electrochemical protection. This problem is exacerbated in chloride contamination situations.
Concrete surfaces are constantly subjected to abrasion and stress from traffic, vehicles and even rainfall. Over time, these stresses can lead to cracks in the surface that may eventually widen to a significant degree, causing loss of structural integrity. It is important that any damage to concrete be repaired as soon as possible to minimize deterioration and potential safety risks.
The first step in any concrete repair project is to determine the severity of the damage and its cause. While it is fairly easy to recognize problems like cracking or honeycombing, determining the cause requires a more in-depth analysis. A full inspection should include consideration of the underlying quality of the concrete, the type of repair needed to correct the problem, the ability to accomplish the repair correctly and adequately, the available time to properly complete the repair and curing processes, and cost comparisons between repair versus replacement.
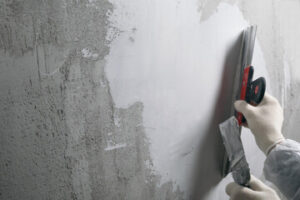
Depending on the seriousness of the damage and the intended use of the surface, different types of repair materials are used. Small cracks in concrete that are primarily cosmetic in nature can often be filled with either a latex-based or polyurethane-based concrete repair product. For best results, the crack should be thoroughly cleaned out and dampened before application. The repair material should be compatible with the existing concrete, and should have a similar composition to the original concrete. A high strength, low permeability mix is often preferred to achieve the best bond and durability with the existing concrete.
If a crack is deep and/or wide, it will need to be sawed or chiseled to allow the new repair to better penetrate the existing crack and provide a stronger bond with the surrounding concrete. The area should then be thoroughly cleaned to remove any sand or gravel that would interfere with the bonding process. Chiseling a backward-angled cut into the existing concrete can help improve the adhesion of the repair to the concrete, and will prevent the new concrete from backing out of the crack.
Whenever concrete repairs are undertaken, proper personal protective equipment (PPE) should be worn. Eye protection, nitrile gloves and a dust mask are essential for any repair operation. Direct contact with concrete and its repair materials can cause chemical burns to the skin and eyes.
Repairing Leaks
When a leak occurs under concrete, it creates pressure that can lift up sections of the slab, putting more strain on the slab and creating more cracks. This is a problem that can lead to serious damage, including mold growth and structural failure. A concrete repair specialist can assess the damage and recommend the best way to fix the problem.
Leaks under concrete are often caused by erosion of the soil around the structure, which causes it to lose support. This can cause the slab to move or crack, and it may also weaken the reinforcing steel that supports the structure. This can lead to structural failure and expensive water damage.
If a crack in the slab isn’t too severe, a hydraulic cement can be used to seal it. This product will set quickly and stop water from passing through the crack, even when there is high hydrostatic pressure. Another option is a crystalline product, such as Kryton’s Krystol Plug(tm). This product uses crystalline technology to react with the moisture in the concrete and form insoluble needle-shaped crystals. These crystals fill in the capillary pores and micro-cracks to prevent water from passing through.
Other types of concrete repairs include using foams or quick-setting mortars to seal leaks and cracks. These products are effective and can be applied quickly and easily, but they must be used correctly to achieve success.
For example, when using a foam such as SAKRETE Plug-tite® to repair a leak in concrete, it’s important to prepare the surface before applying the material. This includes cleaning the area and removing any loose material with a broom or brush. It’s also essential to dampen the area before applying the product so it adheres to the concrete.
When repairing leaks, it’s essential to use a concrete repair product that has been tested and proven to provide long-lasting repairs. The right product will save you time and money in the long run. It will also be safer for the environment and your workers.
It’s also important to consider the type of rebar treatment that is needed for the concrete repair project. If the parent concrete is chloride-contaminated from deicing salts or exposure to seawater, it’s recommended to use a type 1 embedded galvanic anode to protect against the potential for new corrosion activity being initiated adjacent to the repair.
Repairing Potholes
Concrete surfaces are subjected to extreme weathering and damage from heavy traffic. If left unattended, such damage can lead to structural problems that may threaten the integrity of the surface and result in costly repair or replacement. Potholes are one of the most common forms of concrete damage that require repairs. While larger concrete damage requires the services of a professional, smaller potholes can often be repaired using simple DIY methods.
Potholes are caused by a number of factors, including weathering and erosion, water seepage, settling ground movement, and vehicular traffic. To reduce their occurrence, a routine maintenance program is essential to keep the surface free of debris and vegetation. In addition, the structure of the surface should be regularly inspected for cracks and other damage. If these damages are discovered, they should be addressed in a timely manner to prevent the deterioration and subsequent failure of the surface.
The first step in repairing potholes is determining the cause and classification (major or minor) of the defect. This is best done by a qualified person who is familiar with the product, function and environment in which it will exist. Once this is established, a standard repair procedure can be developed for the product.
During the repair process, it is essential that the existing surface be swept or blown clean of any loose material prior to application of the repair material. Any free moisture in the existing surface can rob the new repair material of its early strength, thus reducing its service life.
In order to ensure that the concrete repair will have a long service life, it is important that the concrete be compacted at time of installation. This can be achieved by hand or mechanical tamper or by multiple passes from a vehicle tire. It is also recommended that the product be allowed to cure for a minimum of 48 hours before the surface is opened to traffic.
When selecting a repair product for the potholes, look for a formulation that contains aggregate ranging from 3-6mm. It is also advisable to select a product that has been HAPAS approved, as it will have undergone rigorous independent testing and has been proven to provide long-term durable repairs.
Repairing Delaminations
When the top layer of concrete hardens before the underlying concrete, a delamination occurs. This can be caused by several factors, including poor mix design, improper stripping/storage, drying shrinkage, or exposure to harsh weather conditions. If left untreated, this can cause structural damage to the structure and expose people to injury. Identifying delaminations and classifying them as major or minor is the first step in repairing them. Once this is done, a repair method must be determined.
Choosing the right concrete repair material is key to the durability of the repaired area. There are many different materials available, some of which can achieve high strength at an early age. However, it’s important to remember that the higher the initial strength of a product, the less durable it will be in the long term. The ideal concrete repair material should provide an optimum combination of physical properties, such as cracking resistance, permeability, freeze-thaw durability and bond strength with the existing concrete.
To ensure a strong and lasting repair, it’s important to prepare the surface thoroughly before applying the concrete. This includes removing loose or crumbling sections of concrete, sweeping the area and ensuring it’s free of dust, dirt and other contaminants that can act as bond breakers. It’s also important to select the right type of repair product for the job and follow the manufacturer’s instructions for application.
After the concrete repair is complete, it’s essential to let it cure properly. This is especially true for repairs that involve exposed areas, such as slabs and bridge decks. It’s also important to protect the concrete from harsh weather conditions and chemicals, and regular pH testing can help mitigate these effects.
Once the repairs are complete, it’s important to prevent future damage to the concrete. This can be achieved by sweeping regularly, sealing the concrete with a protective coating and keeping it clean of dust and debris. Lastly, a schedule of regular maintenance can help avoid the need for costly repairs in the future. For example, a routine chloride test can monitor the level of chlorides in the concrete and prevent corrosion, while regular pH testing can help to minimise alkalinity that leads to carbonation.